I am no longer actively blogging here at "Taking Time To Create", but I'd love for you to join me at my new blog: "Taking Time In The City". I hope to see you soon!

Showing posts with label Autumn. Show all posts

Friday, October 26, 2012

Okay, Fall, I Give Up

 
I've been in denial. Fall can't already be here, can it? No, it's not. If I ignore it maybe it will go away? Guess not. Don't get me wrong...I actually love Fall. It's just that Fall leads to Winter which leads to my fingers being frozen for the next few months. Good grief. For someone who lives in Colorado, I sure am a wimp! 

Well, I couldn't ignore it any longer, so I finally got out my Fall decorations this week, and I thought I'd share my "tablescape"/centerpiece with you. I bought nothing for it, so I love it all the more. I love the blue pumpkins, but I've struggled with arranging them in years past. Then a pumpkin hit me in the head (no not really-that would hurt!), and I realized that I should combine them with other pumpkins...real ones that we already had to be precise. Combine those with a votive candle set my mother-in-law gave us, a yellow piece of fabric for a runner, a glass bowl turned upside down for a pumpkin stand, and a box wrapped in another yellow piece of fabric for a shorter pumpkin stand, and I think we have a winner!
I'm loving it!
---------------------------------------------------------------------------------------------
On a side note, I've been super, super busy getting ready for our road trip to Disneyland and have lots and lots to share over the next few weeks. I don't think I've ever had so many posts lined up this far in advance! There's some fun stuff ahead that involves duct tape, sewing, games, and more! I hope you'll head on back next week. Have a great weekend!


I'm linking at these great parties:
Mondays: Sweet Sharing Monday *  The Girl Creative * Destination: Cutesy Monday * What's In The Gunny Sack *  Made by you Monday*Make It Yourself Monday*Mop It Up Mondays*Make The Scene Monday*Make It Pretty Monday*
Tuesdays: Riverton Housewives Roundup *  Show Me What You Got * Tuesday Time Out  * Tasteful Tuesdays * Too Cute Tuesday*Tuesday's Treasures*Crafty TuesdayTrendy Tuesday
Wednesdays: Super Link Party * Show & Share * {Wow Me} Wednesday *From Dream To Reality*Create & Share*What I Whipped Up Wednesday*What We Wore & Made Wednesday*The Creative Spark Wednesdays* Milk & Cuddles*Made By Me Wednesdays*Adorned From Above*
Thursday: Pin'Inspirational Thursday Recipe Roundup *A Crafty Soiriee * Creative Thursday *Taylor House Thursday*Transformation Thursday*Hookin Up With HoH*Creative Juice Thursday*Live Laugh Linky Thursday* Link Party Thursday*Taking A Time Out Thursday*Eat Make Grow*
Fridays: Delicately Constructed Fridays * Flaunt It Friday * Financial Friday Link Up  *Friday Fun Party* Friday Flair*Pity Party*Frugal Friday*Friday Favorites*Weekend Craft Soiree*Weekend Warmth*One Creative Weekend
Saturdays: Strut Your Stuff Saturday * Once Upon A Weekend * Sharing Saturday * Dare To Share Saturday * Craft, Create and Inspire * A Pinteresting Party*Serenity Saturday
Sundays: Nifty Thrifty Sunday * It's Overflowing Sunday Party  * Cooking & Crafts Party


Monday, January 16, 2012

Holiday Hiatus Roundup

I've been on a bit of a holiday hiatus as far as the blogging was concerned, but I've still been creating! I think I'll share some more detailed versions at some point, but in the meantime, here's a glimpse of what I've been up to:
When I saw this Thanksgiving advent calendar at Lil Luna (guest poster Rachel from Family Ever After), I just had to do my own version. I don't have nearly as many Thanksgiving/Autumn decorations as I do Christmas ones, so I jumped at this idea.
I'd never made a sock monkey before, but when I saw this post about making sock monkeys for wildfire victims in Texas at Dollar Store Crafts, I decided to give it a try. I followed this tutorial, and I think it turned out pretty well. This little guy is now in the arms of some little one in Texas. I love the thought of that!
My new tree skirt was probably my favorite holiday project. Every year I say I'm going to buy a tree skirt, but I can't every bring myself to pay for one (some of them are very expensive). One day I was in my local dollar store and came accross table runners that just screamed "tree skirt", so I bought four of them and voila! A $4.00 tree skirt! It's much better than the piece of fleece I was using before.
The last project I'm going to share is my card holder. It's just a piece of cardboard (from a diaper box!) covered in some fleece and ribbon. I tacked down the ribbon in places on the front to create "pockets" of sorts for the cards.


They were fun projects, and I'm looking forward to getting them back out again next year. I hope you're inspired to take time to create some of your own projects!


I'm linking to these lovely linking parties.

Friday, October 21, 2011

Five Fall Favorites

I'm feeling so inspired to create some Autumn/Fall projects. Here are some of my favorite posts I'm thinking about this Friday:

I plan on making a wreath like this after Halloween comes and goes:
 Mini Pumpkin Wreath from Snowflakes & Dragonflies
This Jack-O-Lantern puppet is so simple but so cute and fun. I think I may try to make a couple for our upcoming pumpkin carving party. I'm sure the almost 2 year old and almost 2 1/2 year old will lose interest in pumpkin carving at some point, so this may be something fun for them to play with.
Pumpkin Puppets
Jack-o-Lantern Puppets from Two Girls Being Crafty
I may have to keep this creative way of packaging candy in mind for future years when my little guy is in school. Such a cute idea! 

Halloween Treats from I Am Momma Hear Me Roar
Although I'm not brave enough (or maybe patient enough) to do this myself, it's a great idea, and the product used has so many possiblities.
Monogrammed Pumpkin from I Am Momma Hear Me Roar
I may have to try making my own version of these candy corn candles for Halloween.
Simple Fall Decorating from Snowflakes and Dragonflies

Tuesday, October 18, 2011

A Leafly Card!


A Leafly Card for a Leafly Day

A few years ago, I tried using leaves as stamps, and I was surprised at how well it worked. So, I decided to break out this technique again and went on a leaf hunt one night while taking a walk around the neighborhood. There are so many interesting shapes! These are the leaves I found for the project:
I think it works best when you have a good variation in sizes and shapes.

You can use the leaf kind of like you would a stamp just be sure to work a little more gently, so the leaf doesn't get torn.

Place the leaf on your paper as you would any stamp.
Here's where there's a little trick. It seemed to work best if I placed a piece of paper over the leaf after placing it where I wanted, and then I pressed on the paper and rubbed it a little to get as much of the ink off the leaf as possible. This kept the leaf in place and kept it from tearing.
You can repeat with the same leaf several times. The only drawback is that you have to use either the same color or a darker color (since you can't exactly use stamp cleaner on a leaf!). The good news though it that you can get a bunch of the same type of leaf if you want to do different colors.
Continue with this process with different colors and shapes of leaves.
I believe I used four different types of leaves with a different color for each type. You can do as many or as few leaves as you would like. I didn't want my leaves too crowded, so I stopped at four.
I created my leaf collage with a piece of paper large enough to cut into pieces for four cards. After I cut each piece I used a sponge and a darker brown ink to distress each piece.
I printed the sentiment on my computer and added some twine to the side for an extra touch. The card base was a precut package I bought a couple years ago and hadn't been able to use yet (I wish I could say I did that scalloped edge myself!).
I stamped a lighter piece of card stock with a larger leaf and glued it to the inside  for the message area.


I went ahead and created all four cards, but placed the sentiments in different places. Each card is unique, but all of them are very leafly if I do say so myself!

Sunday, October 16, 2011

Blue Autumn Centerpiece

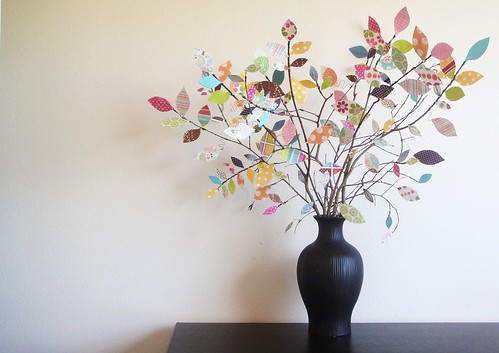
When I first saw the tree centerpiece in this blog post at Everyday Mom Ideas, I just knew I had to do something with branches. 
Scrapbook paper tree


Then I saw this centerpiece at Dollar Store Crafts with a combination of pumpkins, a tray, and some other little items.


dollar store crackle pumpkins

I remembered that I already had some blue colored pumpkins from last year and went on a scavenger hunt around the house for some other items to go with them. Here's what I came up with:


The tray is actually a picture frame-I inserted white paper instead of the picture. I had the vase, candle holder, and clear marbles in a cabinet/in my craft supplies, so the only thing missing was a branch. Strangely enough, the day before we had some pretty harsh wind that broke a huge tree branch from a tree in our back yard, so I cut off a piece of the branch and my dear husband spray painted it for me with some silver spray paint we already had. The whole project only took a little while and the only price was a little time. I'm enjoying it, and I think it goes well with my colors!

I hope you're inspired!