Pages

Thursday, May 31, 2012

Recipe Thursday {Strawberry Jam}

I'm so excited about this jam! It was my first attempt at canning, and all went very well. Oh, and it tastes soooo delicious!! It's so good that I ate that spoon full of jam all by itself after I took the picture above. Yum!


I used a recipe in my Better Homes and Gardens Cookbook as a starting point. I also found a version of the recipe on their website here. On a side note, if you don't have that cookbook, I'd run out and buy it. It not only has a lot of recipes but lots of tips, tricks and techniques to help you along the way. I got mine a couple years ago and LOVE it! And no one's paying me to say that :-)
Here's my version of the recipe:


This recipe makes 4 pint jars or 8 half pints.

  • About 2 quarts strawberries. I think this turned out to be about 3 pounds of strawberries.
  • 1 1 3/4 ounce package of powdered fruit pectin (I found mine in the baking aisle at Target along with my jars)
  • 1/2 teaspoon butter or margarine
  • 7 cups sugar (yes, 7!)
Hull your strawberries.

I pureed my strawberries in my blender until I had 5 cups of pureed strawberries. Looking back, a food processor may work better for this. I had to do a cup or two of strawberries at a time. You'd probably be able to do more than that at a time with a food processor.

Place your puree in a heavy bottomed large pot. Mine was 5 quarts. Stir in pectin and butter.

Heat on high until mixture comes to a full rolling boil. You've got a rolling boil when you can't stir it down. Be sure to constantly stir the mixture or it will scorch.

Add your sugar all at once. I measured out all my sugar and had it in a bowl waiting before I started the puree mixture boiling, so I could be sure to continue stirring. Return the mixture to boiling and boil for 1 minute, again stirring constantly. 

Remove from the heat and skim off the foam with a metal spoon. 

Ladle immediately into hot, sterilized jars (the original recipe says to use half pint jars but I used pint jars). Be sure to leave a little room (about 1/4 of an inch) at the top  in case the jam expands. Wipe the rims of your jars clean before fastening the lids.

Process your jars in a boiling water bath. I don't have a water canner, so I just used a very large stockpot (I got the idea here), and it worked just fine. The original recipe called for a processing/boiling time of 5 minutes, but I processed the jam for 20 minutes since our elevation is above 6,000 feet. You'll start the time once your water returns to a boil (if it stops boiling when you put the jars in the water-mine didn't stop boiling). There was a conversion chart included with the jars I bought. You can see a conversion chart here.

Once the processing time is complete, remove the jars and let them cool. It takes quite a while for them to cool. I just let them sit for about a day before moving them. They will seal as they cool.

It is quite a bit a work but not quite as difficult as I thought it would be. I plan on doing it again sometime!
Oh! I have one more little tip. If you need something to store your cans in, try a Costco milk box.
It's the perfect size for 8 pint sized jars...

I'm having a blast at these lovely linking parties.

Wednesday, May 30, 2012

Made By You Jam Labels {Free Printable}


I tried my hand at making and canning strawberry jam the other day (post on that coming tomorrow), and I wanted to come up with something cute to add to the jars. The jam turned out great, so I wanted the packaging to match the yummy jam (it is sooooo good).


I went for simple but cute with these printables.
There's a little back story to the "Erin Made It Jam" label. My dad's mom (who we call Bama) is an expert canner and a pretty darn good seamstress. She makes us all kinds of things for birthdays and Christmas and we refer to them as "Bama Made It..." For instance "Bama Made It Jelly" or a "Bama Quilt". She made the tent I shared here. So that's where that little phrase comes from.


I wanted to add a little something in addition to the labels, so I cut a circle of fabric to attach to the lid. 
I used a CD to get the size I wanted, but if you want your fabric to hand down a little more, then you could use something like a bowl or plate. I just traced around the CD with a pencil and then cut the circle out. I imagine the fabric will eventually fray, so you may want to zig zag it if you want to prevent that.


Remove your ring from your jar and lay your fabric on top centering it as best as you can.
Screw the ring back on your jar, and your fabric is attached.
I added some twine around the ring.
This is how I attached my label, but you could also do something like this:


Want to make your own? I've got printables available below for download. You can use a 1.5 inch circle punch and then a scalloped circle punch to frame the label. Here are the printables! I hope you enjoy them. :-)


All of the printables are blank, so you can either add your own name. There is also a "Made For You By..." option if you like that better than the "...Made It Jam" option.


"...Made It Jam" with strawberry: Half Page or Whole Page
"...Made It Jam" without strawberry: Half Page or Whole Page

"Made For You By..." with strawberry: Half Page or Whole Page
"Made For You By..." without strawberry: Half Page or Whole Page


I'm having a blast at these lovely linking parties.

Tuesday, May 29, 2012

Hippo Birthday To You {Boy's Birthday Card}

 
My little guy has become fascinated with hippos over the last couple of months. They're really not all that exciting, but he thinks they're cool. :-) Soooo, when I was looking through my stamps for a boy birthday card for May (not for my little man but for one of my little cousins), this one jumped out at me. What a cute little hippo!
See? He's adorable!

Want to make your own? Here are a few of the details of the card:

As usual, I started with a base of white card stock which folded in half created a 4.25x5.5 inch card. I cut a large portion of the front corner off at an angle. Then I cute two piece to fit on the front of the card-one slightly shorter than the other with the same angle. 
This part was a bit tricky, but with a little trial and error I got my angles right and layered my papers on the front of the white base.

Then I created the hippo piece. I cut a piece of white card stock just larger than my hippo stamp and then I cut a blue piece of card stock about 1/4 inch wider and taller than that piece. I stamped the hippo and then stamped confetti all around him (yes, I think it's a him) in different, complimentary colors to match the other colors in the card.
I also stamped a party hat, cut it out and attached it above his head. At first I tried just stamping the hat above his head, but it just didn't quite look right. I like how this turned out much better!

I stamp the "Happy Birthday" sentiment on a piece of white card stock just slightly larger than the stamp and then cut the two words a part. To create a border for these pieces, I cut green pieces of card stock 1/4 inch wider and taller than the "Happy" and "Birthday" pieces.

Then I attach them at angles to the front of the card. Cute, huh? I think the angles add a little character to the card.
Finally, to the give the card a little more dimension, I stamp the inner sentiment with confetti all around it which you'll be able to see even with the card closed since that corner it cut off.
And there you have it folks! A "Hippo Birthday" card for that little boy in our life.

I'm having a blast at these lovely linking parties.

Monday, May 28, 2012

House Transformation {Happy Memorial Day}

I hope you all are having a wonderful Memorial Day and that your weekend has been great! Just a quick post today. We've been working on our yard and I've share some of our backyard, but I've got a fun before and after to show  you.

Here's a picture of our house when we first bought it a little over 3 years ago.
We've done little a little bit at a time over the past few summers and we're pretty much finished with it now. Here it is!
I love how it's so much more cheery now!

Enjoy the rest of your day. :-)

Friday, May 25, 2012

Technique Tuesday{Friday}: Graduation Cards

I intended to post this Tuesday, but we went to the zoo instead! We decided to get a membership this year, and I'm so excited about it. We already have a second trip planned for next week!
I think he kind of thought the zebra was real...or at least it should move. He kept telling it to get up. Silly boy. :-)


If you're like me, you probably have some graduations coming up this week. A couple of my cousins are graduating this year. I remember when they were born and was a flower girl in one of their parents' weddings, so it makes me feel a little old/weird. They're both girls young ladies, so I've got some more feminine cards to share today. Here's the first.
Here's a little bit on how to put it together.

The base is white card stock folded in half (like a hot dog) to create a card 4.25 inches by 5.5 inches.

The light yellow piece was 4 inches by 5.25 inches. I layered the striped piece (5.25 inches by 1.5 inches) on top of the yellow and then the maroon (or rose red) piece (5.25 inches by 2 inches) on top of that. 
 I stamped the "Graduate" stamp twice: once in two different colors. I cut a circle around the entire stamp and then use a 1.25 inch circle stamp to punch the "G" out. Then use a dimensional adhesive to attach the "G" Glue that piece to the card.
 I stamped a couple flowers and punched them out with the 1.25 inch circle stamp.
 Then I attached them both above the "Graduate" piece.
I added a "congratulations" sentiment on the side of the layered paper. You could emboss this or use use some type of lacquer. And there you have it!

For the second card, I went a different direction. 
 This card has the same base of a white piece of card stock folded to create a card 5.5 x 4.25 inches.
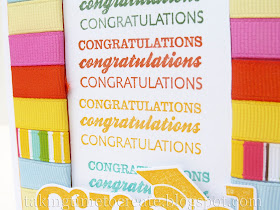
 I cut slits on each side of a piece of white card stock and then stamped the "congratulations" sentiment in several different colors in between the two slits.
I cut small pieces of ribbon and inserted them into the slits, wrapped them around the edges, and fastened them to the back with masking tape.
I stamped the "grad" sentiment in a darker yellow, cut it out, and attached it with a dimensional adhesive. Then, I attached the whole piece to a mustard yellow piece of card stock 5.25x4 inches, and then attached the whole thing to the white base. Here's the end result!


I'm having a blast at these lovely linking parties.

Monday, May 21, 2012

Blooming and Growing{Garden Sprouts!}

This weekend sprouts started popping out of the ground in the garden!! I'm soooo excited to see all my hard work paying off. :-)


Here's one type of squash that has sprouted. I planted three different kinds. One still hasn't sprouted, so I'm crossing my fingers on that one.
Next we have some lettuce sprouting.
It's just getting started as you can see when compared to my thumb (and I have fairly small hands).
I think the carrots and spinach may be coming up too, but I'll wait until they get bigger to share pictures of those. It's a little hard to distinguish them from other things growing around them (grass, etc). 

I'm the most excited about this next one. Corn! We've never tried corn, so I'm excited to see how it will turn out. I picked seeds with the shortest growth until harvest since our growing season here in Colorado is so short. We'll see!
They're looking pretty good so far! 

While I was out looking at the garden, I also noticed that some roses have bloomed. Beautiful!
We had some birds build a nest in one of our patio lights, so I thought I'd try to get a picture of the eggs. Aren't they cute?
They're parents scare us half to death every time we walk by the light. They come flying out so quickly that it feels like they're almost attacking us! They're really just flying away from us, but it's pretty hard to get used to it. It's ok though. I don't mind dealing with it for the little baby birds that will hatch at some point. :-)

I love this time of year! It's so nice to get out in the yard. :-)

I'm having a blast at these lovely linking parties. 

Friday, May 18, 2012

Favorite Find Friday

The pictures will take you to my pin. I've included the direct links below each picture. Check 'Em Out!


Jello Cookies from I {heart} Nap Time
These look like so much fun to make and so tasty!


Painting Wooden Spoons from Little Bit Funky
These are just so adorable! What a great way to liven up those boring 'ol spoons.


Dinosaur Feet Craft from Activity Village
These look like so much fun! My little guy recently discovered dinosaurs, so I think this might be something fun to make with/for him. 

You can always find me on Pinterest to see more of my finds from around Blog Land. I hope you all have a wonderful weekend!

Thursday, May 17, 2012

Stretch Your Garden Dollar: Spray Painted Pots

You know those pots that plants usually come in from the store? Sometimes they're just a thin plastic and sometimes they're pretty sturdy. Over the years, I've collected several of these that I couldn't manage to part with even though I wasn't going to use them to display any flowers (not sure why I was saving them). Then I had a thought: spray paint!
That's how these lovelies were born. They were originally a combination of blacks, greens, and that earthly, sort of orange color that we typically see in pots. I wasn't sure how it would turn out, so I bought the cheapest spray paint I could find and sprayed away.

They aren't perfect...
But that was largely in part to operator error/impatience. Yeah, I can be impatient...working on that though. :-) Even with my impatience, they mostly turned out great! The spots you can see in some of the pictures are water spots from the sprinklers. :-)

I think they have the effect I was going for though, and who can beat $5.00 for this many colored pots (I even painted a larger one that's not pictured here)? Not bad if I do say so myself.
They add even more color to the flower bed than just the flowers would. Love, love it! At some point I may have to spray paint my nicer pots that are that terracotta color (there! I remembered what's it's called...not just earthy, sort of orange). I think it adds some extra "umph"...a punch of color.

And the colors of the pots are a great compliment to the flowers...


Loving them!

I'm having a blast at these lovely linking parties.